
Advanced Design Tips
Once you are comfortable with the basics of the Motocal Editor, there is a lot more you can do with it (if you are still learning check our first time designer guide here).
You can build Designs from scratch, use Icons and Stencils in different ways, work across multiple Decals, create more detailed backgrounds, and make better use of the tools already inside the platform.
Here are some tips that can help you get more from your next Design.
1. Choose a Theme for the Best Starting Point
Even if you plan to change most of the Design, starting with the right Theme can save you a lot of work.
When you are inside the platform, after the Discovery stage, Motocal will show the Themes available for your selected Vehicle. Each Theme gives you a starting layout across the Graphics Kit, including its own shapes, lines and color structure.
Try to choose one that is reasonably close to the look you have in mind.
For example, think about:
• Whether you want something clean, minimal, retro or more race-inspired
• Whether the Theme already uses a color structure you like
• How detailed you want the finished Graphics Kit to be
You can still change the colors, text, numbers, logos and graphics afterwards. The Theme simply gives you a useful place to start.
2. Build your Design from Scratch
If you want more control over your Design, you can create your own look without using a Theme. In the Selector, you’ll find a Clear Features button in the bottom-left corner. Clicking it will ask you to confirm that you want to remove all existing features from your decals. Once confirmed, you’ll have a completely blank starting point and can build your Design from scratch. From there, add shapes, patterns, Icons or your own uploaded graphics to build up the background.
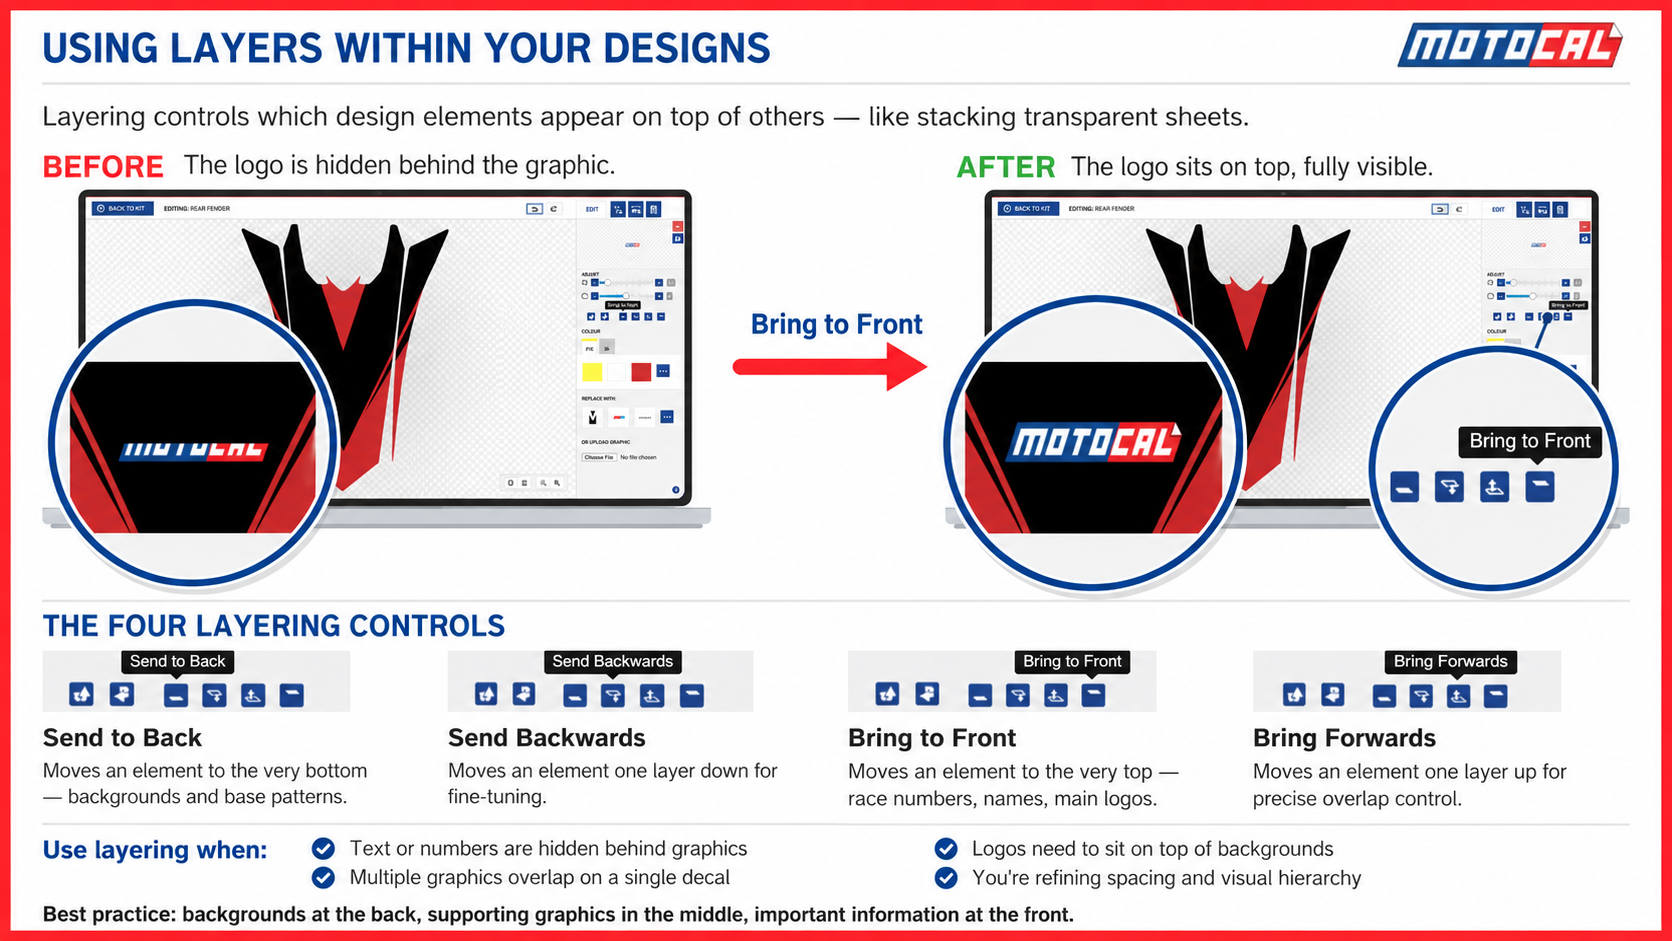
As the Design becomes more detailed, layers become particularly important: Keep your main background elements at the back, supporting graphics in the middle, and important elements such as race numbers, names and logos at the front.
Once you are happy with one side of the Vehicle, the Motocal platform will prompt you upon completing editing one side, to mirror the Design on the opposing side. This usually gives you a much better starting point than trying to recreate the same layout twice.

3. Turn an Icon into a Background
Icons do not have to be used only as small individual graphics. You can take an Icon from the Motocal Image library, enlarge it and use it as part of the background of a Decal.
To do this:
1. Open the Decal you want to work on.
2. Click Add Graphic.
3. Choose an Icon from the library, or upload your own.
Increase its size until it covers the area you want.
4. Move and rotate it into position.
5. Use the Layering controls to send it behind your text, logos and numbers.
This is a simple way to create a more detailed background without having to build every shape individually.

4. Try Stencils
Stencils are useful when you want to add more depth or create cut-out and layered effects in your Design.
Start with your background, then click Add Graphic and search for Stencil in the Icons Library.
Once you have added one, you can resize, rotate and reposition it just like another graphic. You can also move it forwards or backwards through your layers depending on the effect you want.
Stencils work particularly well when they are used as part of the background rather than competing with your main logos, numbers or text.
5. Add Gradient Spikes
If you are looking for a more aggressive or race-style effect, there are gradient spike graphics available in the Icons Library.
Open Add Graphic, use the additional Icons options and search for the tag “spike”.
Once you have found one you like, add it to the Decal and adjust it to suit the shape of the panel.
You can:
- Resize it
- Rotate it
- Flip it
- Reposition it
- Change its colors
Try to follow the natural direction of the Decal rather than simply placing the graphic on top of it. This usually helps the finished Design flow better.
6. Put Text on Multiple Lines
You do not need to create a separate text box for every line of text.
When editing your text, press Return or Enter to move onto another line within the same text element.
This is useful for stacked names, short phrases or other areas where you want several lines to stay together.
It also makes the text much easier to move and align later.
7. Reuse Uploaded Graphics
If you want to use the same uploaded logo or graphic several times throughout your Graphics Kit, upload it once and reuse it.
There is no need to upload another copy every time you want to use it.
This is particularly important on Designs containing a lot of large uploaded images. Too many separate large files can make the Design heavier and may eventually affect browser performance or the Design itself. Reusing the same uploaded graphic keeps things much more manageable.
8. Look for Alternative Decal Shapes
Some Vehicles have more than one Decal option available for a particular Position.
Hover over the Decal in the Selector and click Show More Decals to see the alternatives available. You can also hover over the alternative options to see their Decal numbers.
This can be useful if your vehicle has aftermarket plastics or a different body shape from the standard OEM setup. Where alternative Decal options are available for your vehicle, you can select the one that best matches the plastics fitted to your bike.

9. Check Whether Decals can be Combined
On some Vehicles, neighbouring panels can be combined into what Motocal calls Joined Template Parts (JTP).
For example, a shroud and side panel may be available as one joined Design area.
Where this option exists, it makes designing across the two panels much easier. You can place a larger graphic across both parts without having to manually recreate and align it on separate Templates.
Check the available alternative Decals or layout options to see whether a joined version is available for your Vehicle.

10. Designing Across Separate Decals Takes a Little More Work
If two Decals are not Joined Template Parts, the Editor treats them as separate shapes.
This means a graphic that runs from one Decal onto another will not automatically line up perfectly.
You will normally need to adjust it manually and you could also clone designs or copy designs from one decal to another.
The Grid tool can help here. Zoom in, compare the position of the graphic against the edges of both Decals and make small adjustments until the overall flow looks right.
It is worth spending a little extra time on this, particularly with stripes, patterns or large graphics that are intended to continue from one panel to another.
11. Use Your Own Colors
If you need a color that is not already available in Motocal, one option is to upload a graphic containing the color you want and use that within your Design.
If you have a specific Pantone reference, you can also email the reference and an example image to info@motocal.com.
We may be able to add the color to the Motocal Icons Library for you, although this can take some time.
Remember that screen and printed colors can still differ slightly, so exact on-screen appearance should not be treated as a guaranteed print match.
12. Start a New Design from Time to Time
If you are going back to a very old saved Design, it may not include all of the newer content and improvements that have since been added to Motocal.
If you are starting a completely new Graphics Kit, it is generally better to start a new Design rather than repeatedly building from an old one. That way, you are working with the latest content available for your Vehicle.
13. Keep Important Elements away from the Very Edge
Motocal Templates are designed to cover the main face of the Vehicle plastics. They are not intended to wrap completely around every outside edge, side facet or return of the plastic.
For that reason, avoid putting an important logo, name or piece of text right against the edge of the Template.
A correctly fitted Decal will normally leave a small, consistent gap around the edge of the plastic.
Keeping important Design elements slightly further inside the Template helps make sure they remain clearly visible once fitted. You could also utilize grids for this.
14. Do not Judge Fitment while the Decal is still Flat
Vehicle plastics have curves, angles and changes in surface direction that can make a flat Decal look unusual when you simply hold it against the Vehicle.
If something looks slightly different before fitting, follow the fitting instructions before assuming that the shape is incorrect. Do not cut the Decal to try to correct the shape before fitting it.
If there is still a fitment problem once you have followed the fitting instructions, take some clear photos and contact Motocal so we can have a look.
15. Leave a Consistent Gap when Fitting
Trying to line the Decal up completely flush with the extreme edge of the plastic is a common fitting mistake.
Instead, aim for a small and reasonably consistent gap around the outside of the plastic.
This gives you some room when positioning the Decal and also helps prevent the outside edge from being exposed to unnecessary rubbing, dirt or lifting.
Before fitting, also check whether there is any excess material or waste cut around the finished Decal that needs to be removed. Check out the Motocal shortcuts here.
Ordering More than one Design?
Each Motocal Design needs to be checked out separately.
If you are placing several Orders using the same email address and delivery address, they can be merged and shipped together.
If you are seeing delivery charges on more than one Order, contact us before placing the Orders and send us the Design Links for the Designs you want to purchase.
Our team can then advise you on how to place them without paying unnecessary additional shipping charges. Reach out to info@motocal.com for order related queries. For all other questions, please reach out to max@graphics.motocal.com
ORDER NOW & SHIP FREE TODAY
Design your graphics online today and Motocal will ship them for free today to you.